This chapter contains the following topic:
Introduction to View Open Items
The View open items selection enables you to examine A/P open items for specified vendors. An open item is any entry in Payables which has been posted but not yet paid.
From View open items you may select to see the distribution history for a specific voucher.
This feature is intended for rapid viewing of information, not for maintenance; so this selection is read-only data: entry is not allowed. There is one exception: notes can be both viewed and added using this selection.
Select
View from the Open items menu.
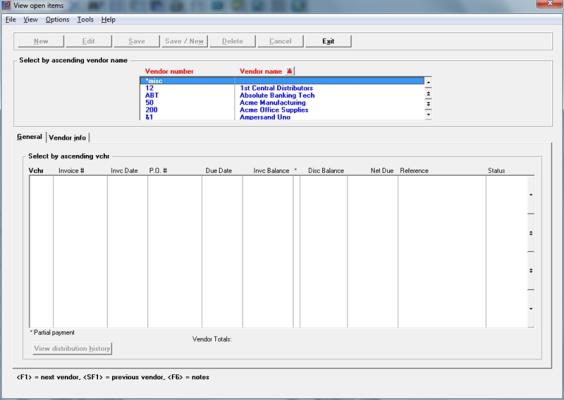
A screen like the following appears:

|
Exit |
Alt+x |
To exit the screen. You may also use the <Esc> key |
Menu Selections
At the top left of the screen menu selections are available. Most of these are the same from screen to screen. If a menu selection is grayed out you will not be able to access it. The selections that are unique to this screen are explained here:
From this screen you can access additional information by selecting the Options menu and then selecting Viewing Vendor Invoices or Vendor notes.
Vendor
The upper list box lists up to 6 vendors at a time. You may sort the vendors by Vendor number or vendor name, both in ascending or descending order. Only column names in red may be sorted. Click on the column name or the arrow to the right of the column name to change the sort or use the View options.
Select the vendor whose open items you wish to view. The vendor must already be entered in Vendors. You may use one of the options to find the vendor:
|
<F1> or Down arrow |
For the next vendor in vendor number sequence |
|
<SF1> or Up arrow |
For the previous vendor |
|
<Page Down> |
To move to the next group of vendors |
|
<Page Up> |
To move to the previous group of vendors |
|
End |
To move to the last vendor |
|
Home |
To move to the first vendor |
Upon selection of a vendor, the open items will display in the lower list box. If there are no open items for the selected vendor, the lower list box will have no data.
Each row in this list box represents a single open item, in order by voucher number. One screen can accommodate twelve open items and you can view more items with the function keys. A vendor total appears following the last open item.
Temporary vendors as well as regular vendors may be selected.
An ampersand ( & ) next to the Vendor totals field indicates that there is a note entered for this vendor.
Menu Selections
From this screen you can also select the following from the Options menu:
|
View Vendor invoices |
To view history for the selected vendor |
|
Vendor notes |
To edit or add notes for the vendor |
The columns are:
Vchr
This is the voucher number.
Invoice #
This is the invoice number.
Invc date
This is the date of the invoice.
P.O #
This is the purchase order number.
Due Date
This is the due date.
The invoice balance includes both discountable and non-discountable portions of the invoice amount and is the balance that remains to be paid.
*
Indicates partial payment
The discount balance shows the discount amount that remains to be taken, though the validity of the discount is not considered at this point.
The net balance is the invoice balance minus the discount balance, and shows the remainder to pay on each open item if the full discount balance is taken.
Reference
This is the reference associated with the voucher.
Vendor Totals:
At the bottom of the screen the open item totals display for invoice balance, discount balance and net due display for the vendor selected. If the vendor has notes an & symbol displays to the left of the Vendor Totals name.
Options
Select from the following options:
|
<F1> |
For the next page of vouchers for this vendor. (if there is one) |
|
<SF1> |
For the previous page of vouchers for this vendor (if there is one) |
|
Vendor info tab |
To see more information about this vendor (details below) |
|
<F6> |
To view or enter notes for this vendor. |
|
View distribution history |
Select this button to view the history of the distributions for the selected voucher. See View Distribution History. |
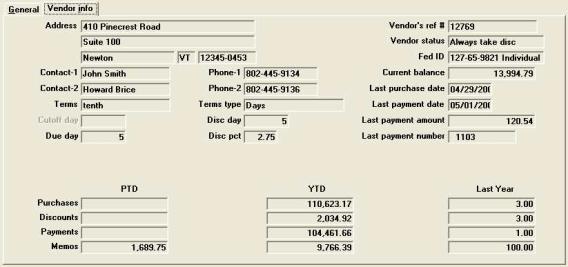
For more information on the vendor rather than his open items, select the Vendor info tab. This tab looks something like the following for Vermont Metal Products:

Select the General tab to return to the view open item screen.
You may have any number of dated notes for a vendor.
Using character mode, for details on entering notes, refer to the Using Notes section of the Use of Function Keys, Tool Bar and Windows chapter in the System User documentation.
|
Format |
10 rows of 77 characters each |
In character mode, there are some additional options for view more fields.
For more information on the open items shown, you can press <Enter>. This controls what appears in the central columns of the screen. There are three possible configurations, and each time you press <Enter> you cycle to the next configuration; the third time takes you go back to the initial configuration.
|
Initially: |
P.O.-# |
Due-date |
Inv-balance |
Disc-balance |
|
Press <Enter>: |
Inv-# |
Inv-date |
Inv-balance |
Disc-balance |
|
Press <Enter>: |
Inv-# |
P.O.-# |
Reference |
|
|
Press <Enter>: |
P.O.-# |
Due-date |
Inv-balance |
Disc-balance |
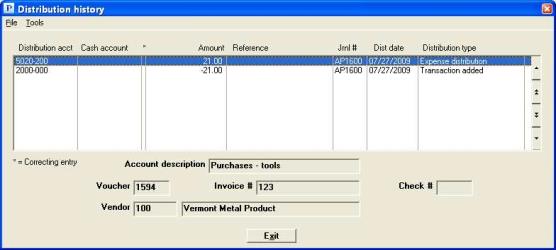
Distribution history provides a list of the accounts, amounts, journal number and the distribution date associated with the voucher. The fields display the associated invoice number and check number.
Select
the View distribution history button from the Open items > View window.
A screen similar to the following will display:

Each row in this list box represents a single G/L account entry, in order by voucher number. One screen can accommodate ten account entries and you can view more items with the function keys. The details for the entry display in the fields at the bottom of the screen.
|
Note |
Distribution history will not be available after upgrading from an older system. PBS 11.7.9 and earlier versions, as well as RealWorld, do not have a distribution history. When there is no history the View Distribution History button will be grayed. |
Options
Select the account entry you wish to view. You may use one of the options:
|
<F1> or Down arrow |
For the next account entry |
|
<SF1> or Up arrow |
For the previous account entry |
|
<Page Down> |
To move to the next group of account entries |
|
<Page Up> |
To move to the previous group of account entries |
|
End |
To move to the last account entry |
|
Home |
To move to the first account entry |
Columns
The columns are:
Distribution acct
This is the valid G/L account number.
Cash account
This is the cash account number. If there was no cash posted with the voucher, this field will be empty.
*
Indicates a correcting entry.
Amount
This amount of the distribution.
Reference
This is the reference for the distribution.
Jrnl #
This is the due date.
Dist date
This is the date of the distribution.
Distribution type
This is the type of distribution. The distribution types are:
| Type | Description |
|---|---|
| Expense Distribution | An expense distribution |
| Transaction Added | A vendor G/L account number |
| Check Amount Paid | The Cash account |
| Discount Taken | Discount taken on the invoice |
| Paid | The offsetting vendor account and cash account |
Fields
The fields at the bottom of the window are:
Voucher
This is the voucher number
Invoice #
This is the invoice number associated with the distribution.
Check #
This is the check number. It will be populated when it was an immediate invoice.
Vendor
This is the number associated with the distribution.
(Vendor name)
This is the vendor name associated with the distribution.
When finished viewing the distribution history, select the <Esc>key or click on the Exit button.